I was reading an article the other day by Joan Rattner Hellman. And I have to say I agree with her when she started the article with the statement: Wouldn't it be great to get your busted and torn stuff-everything from toasters to clothing - fixed for free? The Dutch do. Such a great word - Free.
So, she goes onto say in her article that they, the Dutch, take used things to one of the country's 40 Repair Cafes, where fix-it volunteers do repairs or show how to do it yourself. Now mind you, European country's are only the size or smaller than most of our states.
She goes on to say that the Cafes, started in 2009 by a journalist as a environmental initiative to reduce waste are supported by grants from the Dutch government, foundations, and individual donations. More cafes are in the works.
According to Joan Hellman, she believes the concept may soon cross borders. The Repair Cafe Foundation is fielding inquiries from groups from all over the world about setting up their own cafes.
I personally think this a fantastic idea, the only way you can begin to clean up the worlds environment is to start in your own little corner and let it spread outward.
For more information, go to repair cafe.org. So, go check it out. I don't know about you, but it's time for that coffee break...once again.
Until next time, today and everyday put comfort in your life. Ciao!
Sunday, September 23, 2012
Saturday, June 2, 2012
La Cucina..La Cuisine..Tin Kouzzina..The Kitchen
Tools needed:
1) Vacuum
2) Wet mop and pail or the Sh-mop,depending on wood or tile floors
3) Fan duster brush with extension pole
4) Your carry-all bag or tray, that includes razor blade holder and
blades, powder cleanser, all purpose cleaner, glass cleaner,bleach
cleaner, acid cleaner, scrub pad & sponge, tooth brushes, your
duster and cleaning cloths.
5) And I must admit I was amiss in not telling you about having a dump
bag, this is a bag that you will be putting your wet and dirty cleaning
cloths. Please don't use one of those plastic shopping bags.
Purchase yourself one of those re-usable bags you can pick up
at your favorite store. Once you've finished your cleaning day you
can take your dirty rags and bag to the washing machine and wash
them together, do not mix with clothes.
After reading this segment you should be able to clean your kitchen quickly and
efficiently. But, before we get started here, lets pick out our music to clean, to
each his own, just pump it up and have fun. You're cleaning through another
free concert.
This may sound redundant, but I just have to say, as usual start the room left to
right, top to bottom. As you enter the kitchen check the ceiling corners for cob-
webs and if your cabinets don't reach all the way to the ceiling,you have to
address that space in between the ceiling and the top of the cabinets, it gets
dustier than you would think. Use your fan duster and extension pole for the
cobwebs in those hard to reach areas (the fan brush can be used for more than
one purpose). Use your vacuum and attachments to reach above the cabinets if
possible, if not use your duster here as well. Just be careful you don't want to
put all that dust into the air(cough,cough). If you have a fan in your kitchen
proceed to the fan.
The kitchen is a room that is going to require a lot of picking up and putting
down and moving items back and forth, the movements will become easier with
time. Because this room can be time consuming we're going to break away from
the norm, because it will be easier and faster. So, let's begin. "The only way to
eat an elephant is one bite at a time"
1) Kitchen counter: Move the items that are on top of the counter forward,
(toaster,blender,cookie jars,etc.).Wipe the counter clean behind them. Dust/
wipe the items and replace them back. Use your all purpose cleaner and cloth,
scrub pad, or scraper on counter. On a Granite counter top,bring it to a shine
using your glass cleaner.
2) Refrigerator: Using your all purpose cleaner to clean the outside,front and
top. Open the the doors,clean door gaskets and air vents.

Stainless steel refrigerators can be cleaned with Isopropyl alcohol, or white
vinegar(spray these on the cloth,not directly onto the refrigerator). There are
specific stainless steel cleaners out there that works really well.


3) Stove tops: Clean hood and filter. Work from the back to front using your all-
purpose cleaner and cloth or white vinegar and cleanser with a white scrubber
pad.
A) Glass top stove cleaner made specifically for glass top stoves. Apply
to surface, let dry, and wipe off.


B) Gas stove top: Set the left and right side grates on the counter. Clean middle
and right and left side of stove top around the burners then replace the
grates.
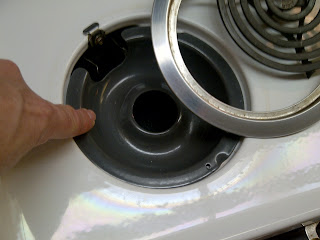
C) Electric stove top: Try cleaning around the burners with the rings in
place, if that fails, remove the burner and ring assembly, with a paper
towel collect all of the debris and if any(grease),then throw away,
continue to clean area and replace burners.


D) Stove front: use a tooth brush and all-purpose cleaner to clean
the knobs and around them. If that fails, remove them by pulling
towards you. Clean the knob, set it aside and clean area behind
them and then replace. Continue on and wipe down the glass
oven door with your glass cleaner.
4) Sink and Dishwasher: use your all-purpose cleaner and tooth brush
to clean around the base of faucet and rim of the sink, use white
vinegar on the faucet area to remove any hard water deposits.
(white vinegar is a light acid that will help in removing the hard water
deposits, without having to scrub with an abrasive cleanser and
end up scratching your faucets chrome or other finish)

Sprinkle cleanser into into the bowl area of the sink and scrub with
your scrub pad, then rinse the sink, be sure to do a good job here,
other wise you'll leave a powdery substance behind (doesn't look good).
You know that pinkish algae stain that you get around the sink drains.
Well, a client of mine gave me a most excellent idea. The "Bleach Pen"
just zip that around the drain and walk away. The next you turn on the
water, "zap" it's gone . Simple, but such a great idea! Talk about saving
time, and you can do the same in the bathroom sinks as well with tub.


5) Floor: Last of all, depending on the type of floor you have, tile or wood
first vacuum then either wet mop or use the Sh-mop. You just finished
the kitchen...I don't know about you, but it's coffee break time..So once
again.
Until next time, today and everyday put comfort in your life. Ciao!
Tuesday, February 14, 2012
Things we tend to over look
Hello all, Its been awhile since I've posted, but I'm still here. I have been very busy with a lot of new clients and I've been testing some different products, homemade recipes and store bought. We can cover this at another time. And I must be honest I got involved with Twitter as well and have become a tweet freak @ronzcompany.
Now, did you know as we go through our cleaning routines, we tend to take shortcuts. A list of those that we tend to overlook are:
1. Window sills and blinds
2. Base boards
3. Lamp shades and light bulbs
4. The ceiling fan and hanging lamps
5. Plants, artificial, and real
6. Chair backs and legs and under the table leg supports
7. Air vents, louvered shutters and closet doors
8. Top of the refrigerator and under the refrigerator
9. Top shelves and bottom shelves of book cases and cabinets, and
of course the books themselves
10. Under the end tables and coffee tables
11. Top of drapes and curtains
12. That area where the electrical cord is laying on the floor, collecting
all that circulating dust balls
All is solved with taking an hour and a duster and your dusting cloth, touching on all of the above mentioned areas once in awhile..... You're done.
Until next time, today, and every day, put comfort into your life. Ciao!
Sunday, February 27, 2011
The Bedroom
Bring along your cleaning tools because now we are going to enter the…BEDROOM! And we are going to enter this room in the same manner as all the other rooms – left to right, top to bottom. We are going to use the same steps to clean the bedroom as the living room and the family room.
1. Using your dusting spray or polish, wipe down your furniture depending on what it is made of. If you have a telephone in your bedroom or in any room for that matter, there is only one way to clean it and disinfect it at the same time. So, you say, “Ron, please tell me how. I just need to know.” Ok, I won’t keep you in suspense another minute longer. Rubbing alcohol and your glass cleaner. Spray your cloth and wipe down the phone, hand receiver, and the charger holder.
2. Vacuum the room. Don’t forget to vacuum under that bed.
IMPORTANT - Now we are going to touch upon a subject that you may not want to hear, but in the interest of your health, I am going to talk about what you need to do to have a healthy and clean bed, which can possibly lead to a healthier you.
Now unless your mattress and pillows are encased with an air tight plastic or polyester cover you need to do the following:
1. You should change your bedding, sheet, and pillow cases on a weekly basis.
2. You should vacuum your mattress, then with a damp cloth and white vinegar, wipe down your mattress and pillows to help keep them clean.
So, I told you I was going to tell you something that you may not want to hear, so here it goes. The human body eliminates 1,800,000 to 2,400,000 dead skin cells every hour, so billions fall off every minute and that’s not including pet dander.
You spend 1/3 of your life in bed and your dead skin cells are the primary food source for dust mites and bed bugs. A typical mattress may have anywhere from 100,000 to millions of invisible mites. Now the cleaning solution I just told you will not kill the dust mites or bed bugs, but it will help to control the issue. Oh yeah and that vacuum bag, throw it out after because mites love warm places. So, for those who suffer from allergies and those who may not, you may find it interesting to go to this website: www. Ehso.com/ehshome/dustimes.php
Whoa, hold your horses, we’re not done yet!! We still have the closet. Wipe down the rings you hang your clothes and any shelving that you may have. Vacuum the floor and top of the baseboards.
And just as a side note folks, this is for our own personal satisfaction – You know all those wood hangers? They are excellent for your clothes and an absolute must as an organization tool for your closet. Hey, I didn’t tell you this, but there is a retail chain that is nation-wide that happens to carry this type of hanger. The name happens to slip my memory. I don’t know something with a couple of (3) B’s. Do you catch my drift? Oh, you didn’t get it? Bed, Bath, and, Beyond!!! Maybe I shouldn’t quit my day job.
So we are done with bedroom. In the next entries, we will cover the dreaded bathroom and kitchen. I have many handy tips to give you that will clean those two rooms effectively. Stay tuned.
Until next time, today, and every day, put comfort into your life. Ciao!
The Family Room
This is one room in the house that gets the most use – a place we go to relax and gather with family or friends and a place where we can unwind after a long day of work. When we have guests over, this will be the room where we congregate, so we want it to be clean and looking it best.
The tools needed to clean this room will be:
1. Vacuum
2. Carry all-bag
3. Ceiling fan brush and extension pole
4. Cleaning clothes
5. VERY IMPORTANT - Music. I find music always make cleaning a room a little more enjoyable. Let’s face it, people don’t like to clean, so why not make it fun with some of your favorite jams. Blast that radio until the neighbors think a night club opened up next door (well maybe not that loud, because you don’t want the cops called on you…we are just cleaning a room.) Maybe even put together a little cleaning mix! Tunes to help you tidy up!
As I have said in previous posts, at the beginning of cleaning any room, we are going to work from left to right, top to bottom. All wall fixtures, pictures, and shelves will be cleaned with your duster and for your mirrors or other glass items you will use your glass cleaner.
Use your ceiling fan brush and extension pole to clean the ceiling fan and move on.
As we move to your entertainment center (including your TV, CD player, DVD player, or game console) use your duster to do the back of your TV and your glass cleaner for the body and screen. Be careful as to not spray directly onto the screen, but instead spray your cloth and lightly wipe down marks, such as fingerprints. Use your duster to wipe down your DVD player, CD player, or game console and spray some all purpose cleaner on a cloth to remove any fingerprints or other dirt. To clean the entertainment center itself use your duster. If you need to remove fingerprints from surfaces, apply duster spray to your cloth and wipe away. Using your duster spray will protect the surface from scratching.
Next you need to clean your couch. Use your vacuum to clean fabric couches and wipe down your leather furniture with your all purpose cleaner. Spray your cleaning cloth and lightly wipe.
But wait, the fun doesn’t stop there because I have saved the best part for last…vacuuming the room!! I told you this would be fun. Vacuuming the floor is pretty self-explanatory, but area rugs, throw rugs, scatter rugs, etc. need a little extra care. Large area room rugs usually have enough weight to them that you would be able to use your upright vacuum as is, but scatter rugs are a different story. I have found that the beater brush on your vacuum can chew up your rug, so my advice would be to not use the beater brush. So what do you do then? Standing on one end of the throw rug to help keep it in place, use your wand and hard floor vacuum brush to vacuum. Always vacuum away from where you are standing, lift up the brush at the end of the stroke and start again, moving from left to right (remember we start everything from left to right.) Don’t use a back and forth motion. Now, come back to your starting point and start the process all over again going in the opposite direction.
You are finished!!! I don’t think so…well with this room anyways because we still have the elephants in the house – the kitchen and the bathroom. So get ready!
Until next time, today, and everyday put comfort in your life. Ciao!
Friday, January 28, 2011
That Little I Don't Know What the Hell to Do with Room - The Hallway
Ok, this is going to be a short post because, well, quite frankly…there is not too much to say about hallways. Whether they are small, large, short, or long, in the average home, they generally don’t require a great deal of time.
If you have a hallway in your house or apartment, start by doing the same as in any other room – start top to bottom, dusting and working both walls a section at a time as you work your way down. You don’t want to be retracing your steps here. Most likely you will only need two tools here – your duster for those pictures or mirrors and your vacuum for the floors.
Now what I am about to say next is a word of advice: If you are vacuuming with an upright vacuum or a canister vacuum with a wand that has a beater brush power head - especially if you are vacuuming between two different flooring materials (ex. carpet to wood) - don’t go over the edge of the carpet with your power head. Why, you ask? In time, the brush will pull up the edges of the carpet and most importantly it will scratch your wood floors. This is something we don’t EVEN want to think about!
Until the next time, today, and everyday put comfort in your life....Ciao!
The Dining Room
Your dining room – a place where your family may assemble for dinner and for any and all special occasions. Regardless of how often it may get used, you want it clean and looking its best at all times. So how should we properly and efficiently clean it?
1. First, you will need the same tools that we used in the previous post to clean the living room.
2. Upon entering the room if there is a doorway, make sure to dust the molding above the entrance. Next, as always, approach the room from top to bottom and left to right - catching those ceiling corner cobwebs, wall fixtures, drapery tops, window shelves, etc.
Next, move to the center of the room, get your duster in hand and dust off that chandelier. Your duster should be sufficient, but if your chandelier is really dirty, I will cover that as a segment by itself later on.
3. Proceed to clean the furniture in the dining room. The process of cleaning the furniture follows the same as you would in the living room, except for the dining table and chairs. Different dining table tops require different cleaning methods. If you have an all glass top - use your glass cleaner, if you have an all wood table – use your furniture polish and polish cloth (if this table doesn’t get a lot of use you won’t need to use the furniture polish each time, you can just wipe it down with just the polish cloth with nothing added to it.)
You will save a lot of time if you clean or polish half of the table at a time, and then dust the chairs closest to you. Next, wipe the arms, rungs (area underneath the chair that joins the legs together), legs of the chairs, and legs and or pedestal of the table. Oh, and don’t forget to brush off the seats. Now, move over to the other side and repeat. Look, you just saved yourself a lot of time by not retracing your steps.
4. Finally, vacuum your floors and carpets and you’re done.
Until the next time, today, and everyday put comfort in your life....Ciao!
Subscribe to:
Posts (Atom)